 |
|
Espresso Café Server Documentation
Index
Espresso Café server and client is an application for use in an Internet café, library or anywhere you need to regulate peoples time on your computers, in a pre-paid environment. This software is ideal for Internet access terminals that are not directly monitored, like in a cafe where your main business is selling coffee!
Why is Espresso Café so cheap? We have priced this software according to the amount of work you will need to do. Due to the way java has been built there is little we can do to the client to make it work in a kiosk/cafe environment securely. You have to make sure the terminal is secure so that the client cannot disabled or terminated. We have provided registry files and tools and info to make a Windows and Linux operating system safe.
Why not use linux to reduce the initial cost of setup. No operating system cost. Low price for unlimited clients, 1 year of free email support and software upgrades, or free if you only have 1 or 2 terminals. Try beating that anywhere else!
Espresso Café generates tokens (passwords) at the server, and can be printed off in sheets, or printed individualy as time is sold. You also have the choice to export the token file into a word processor of your choice. These cards can then be sold over the counter, or out of a vending machine.
Your customer enters the token into the Espresso Café client terminal and gains the specified amount of time at the computer. Most commonly used for Internet access, but can be tailored to any need.
If not already installed, please install a Java virtual machine. We recommend the Java 2 runtime environment which can be downloaded for free at http://java.sun.com, or try the new automated download and install for Windows at http://java.sun.com/getjava/download.html.
|
Extract Server.zip to a directory.
To start the server for the first time change to the directory Espresso Café Server is installed. To execute use either “java –jar Server.jar” or
“javaw –jar Server.jar”.
Most newer operating systems will execute the .jar file by simply double-clicking. |
 |
|
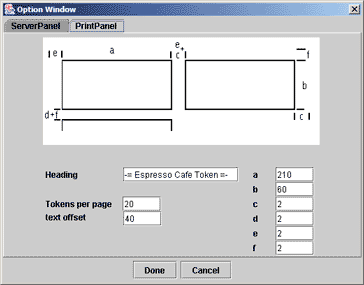
See option window before starting the server.
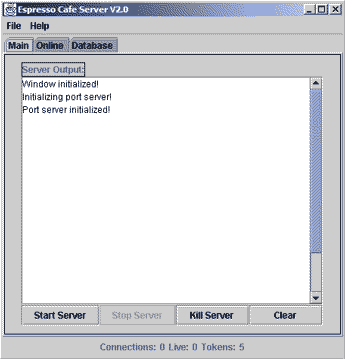
From the main window of the server it will give you live information on what events are taking place.
In the server output text area, you will see when tokens are removed, any errors etc. There will also be a visual indication on the status of the server. Green square if started, red square if stopped. Connections show how many people have connected since the server was started and Live is how many are currently connected and using the service.
Tokens show how many tokens are remaining in the database. |
 |
|
Server Panel Tab: These are options specific to the server operation. Listening Port:
|
 |
|
|
|
|
Print Panel Tab: These are options specific to the printing of tokens.
|
 |
|
a,b,c,d,e,f:
|
|
| We recommend experimenting with the values of the Print Panel tab. The values are updated immediately, and values can be previewed after choosing to generate multiple tokens from the database page. | |
The Espresso Cafe database is now displayed in a table. You can sort the table ascending by clicking on the row header. To sort Descending hold down shift while clicking on the column. You can sort by any column.
|
Add button:
Multiple button: Used to create many random tokens, and will prompt you with a dialog:
Edit: Edit selected token. For modification of most properties. If you have made a personalized token for a regular customer you will want to make the "First Used" field far into the future. I.E.: year 4000, so the purge routine will never kill it. Find: Type in the token you wish to find. If it exists it will be highlighted. Delete: Delete selected token/s. A range can be selected, and even a non contiguous range.
Purge:
|
|
|
|
The Multiple button will cause the “New Token” Dialogue box to appear. From here you can:
|
|
Save:
|
|
|
Done:
Cancel:
|
|
|
The Print button will bring up a print preview of the newly created tokens. Be sure to test the settings in the Print panel options, and adjust as necessary . As they may be slight differences on the printed version. |
 |
|
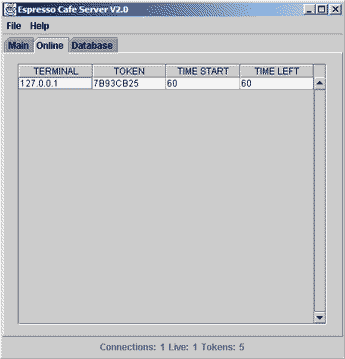
Here at the Online Tab you can see at an instant what tokens are currently in use, what time they started at and how long they have left. You see the IP address of the computer and if you use a DNS server or hosts file you will see your hostname assigned to the IP address.
When the Time Left field is larger than the time start field, it means the user has used the combined time feature. |
 |